Showing posts with label recipes. Show all posts

Saturday, May 17, 2014

Rhubarb Custard Pie

I know I promised you another rhubarb recipe.  And I will assure you, this is hands down the best use of rhubarb you will ever find (or I am not a Crozier!!)  "Rhubarb custard?" you ask.  "What is that?!"  Those were my words too, some 10 years back.  But thankfully I began truly living in the year 2004 when I Mr. Crozier and I became official.  You see, this pie is a favorite of all the Crozier men and so dating and soon marrying one meant I absolutely must master this famous family recipe.  But golly gee was I ever nervous.  I don't know if I even attempted it for my first 3 years as a Crozier.  The stakes were just too high.  But I finally worked up the nerve to call my mother-in-law and ask for her recipe.  What I jotted down to this day still makes me laugh:
Could you pull off a perfect pie with only a list of ingredients?  Certainly my mother-in-law also told me the steps for preparation but why I didn't write them down is still a mystery to me.  So I played trial and error for oh about 12 pies over the course of the years until my husband finally, just recently actually, said I nailed it.  Hallelujah!  A Crozier I shall remain.

It is for this very pie that I became a rhubarb farmer (if growing one rhubarb plant permit one to adopt the title of "farmer").  I usually think to make this pie in the dead of winter when, alas, rhubarb is nowhere to be found.  But now I've learned that rhubarb freezes beautifully and so regularly harvest stalks from my plant, cut them into 1-inch chunks, and throw them into a gallon zip-lock in the freezer.  

Of course, I can't give you a pie recipe without taking a moment to talk pie crust.  But here is where my cheeks turn rosy and I must make a confession: right now, in this phase of life, I buy my pie dough.  There.  I said it.  I love all things homemade but when I discovered Trader Joe's sells a dough without hydrogenated oils or shortening and my husband deemed it my best pie yet the first time I used it (ok, so I didn't tell him it was store bought...), I was sold.  Sure, someday I will probably go back to making my own shortening-free version, but for now this product is a lifesaver.  And when I use it, this pie suddenly falls into the "easy recipe" category and I would venture to bet those two words have never before been used in reference to pie.

Ok, enough chatter.  Time for the recipe!  I added some preparation instructions to the handwritten ingredient list I've always gone off of (you're welcome!)  I love using my deep-dish pie plate so have adapted the measurements accordingly.  You can follow the measurements in the photo above if you're using a regular Pyrex pie plate.  Also, it is an absolute must that this pie be served a la mode.  A MUST.  The Croziers did not know what they were missing before I joined their family and righted their ways!

Rhubard Custard Pie
(Adapted slightly from the Crozier Family)

1 1/2 cups sugar
1/4 cup + 2 Tbsp flour
1/4 tsp ground nutmeg
Dash of salt
4 eggs, beaten
6 cups of rhubarb, cut into 1-inch chunks
1 pastry for a 9-inch double crust pie 

Preheat oven to 400 degrees F.  To prepare the custard, combine sugar, flour, nutmeg and salt in the large mixing bowl.  Add beaten eggs and whisk to mix.  Stir in rhubarb until coated with custard. 

Place bottom pastry in a 9-inch deep dish pie plate.  Pour in rhubarb filling.  Top with second pastry, forming a lattice pattern, if desired.  Bake for 35 minutes and check on pie.  If edges of crust are darkening too rapidly, cover them with foil, leaving the center exposed.  Return to oven for another 15-25 minutes or until filling is set. 

Sunday, April 6, 2014

Salty Chocolate Chunk Cookies

Guys! I finally have a go-to chocolate chip cookie recipe. Chocolate CHUNK to be specific. This feels like a real milestone in my venture toward adulthood (which, by the way, I have still not reached). I may have made them twice already. This week. They are the perfect oh-crap-company's-coming-and-I-need-to-make-dessert sort of treat. Be careful not to overcook them (they firm up as they cool) and you'll end up with the best ooey gooey middle. The highlight for me of course is the salt on top. What can I say? I am a sucker for this sweet and salty dessert trend, which I hope never ends. I know, I know - are dietitians supposed to like dessert AND salt? Shoot me, I guess.

And these cookies also don't mess around with their chocolate-to-cookie ratio. I know it's really tempting to use chocolate chips (and do it if you have to) but really it's the chunks that set these cookies apart. Our Trader Joe's just started carrying bags of chocolate chunks and they are now a staple in our house. Because these cookies are becoming a staple. Don't be bashful. Dump the whole bag in if you want. I promise you won't regret it.

Salty Chocolate Chunk Cookies
(adapted from Bon Appetit Magazine)

1 1/2 cups all-purpose flour
1 teaspoon baking powder
1/2 teaspoon kosher salt
1/4 teaspoon baking soda
1/2 cup (1 stick) unsalted butter, room temperature
3/4 cup (packed) light brown sugar
1/2 cup sugar
1/4 cup powdered sugar
2 large egg yolks
1 large egg
1 teaspoon vanilla extract
8 ounces semisweet chocolate, coarsely chopped (I use Trader Joe’s chocolate chunks)
Kosher or other flaky sea salt

Place racks in upper and lower thirds of oven and preheat to 375°. Whisk flour, baking powder, kosher salt, and baking soda in a medium bowl; set aside.

Using an electric mixer on medium speed, beat butter, brown sugar, sugar, and powdered sugar until light and fluffy, 3-4 minutes. Add egg yolks, egg, and vanilla. Beat, occasionally scraping down the sides of the bowl, until mixture is pale and fluffy, 4-5 minutes. Reduce mixer speed to low; slowly add dry ingredients, mixing just to blend. Using a spatula, fold in chocolate.

Spoon rounded tablespoonfuls of cookie dough onto 2 greased baking sheets or baking stones, spacing 1-inch apart. Sprinkle cookies with kosher or sea salt.

Bake cookies, rotating sheets halfway through, until just golden brown around the edges, 10-12 minutes (the cookies will firm up as they cool). Let cool slightly on baking sheets, then transfer to wire racks; let cool completely.

Makes 24 cookies

Tuesday, April 1, 2014

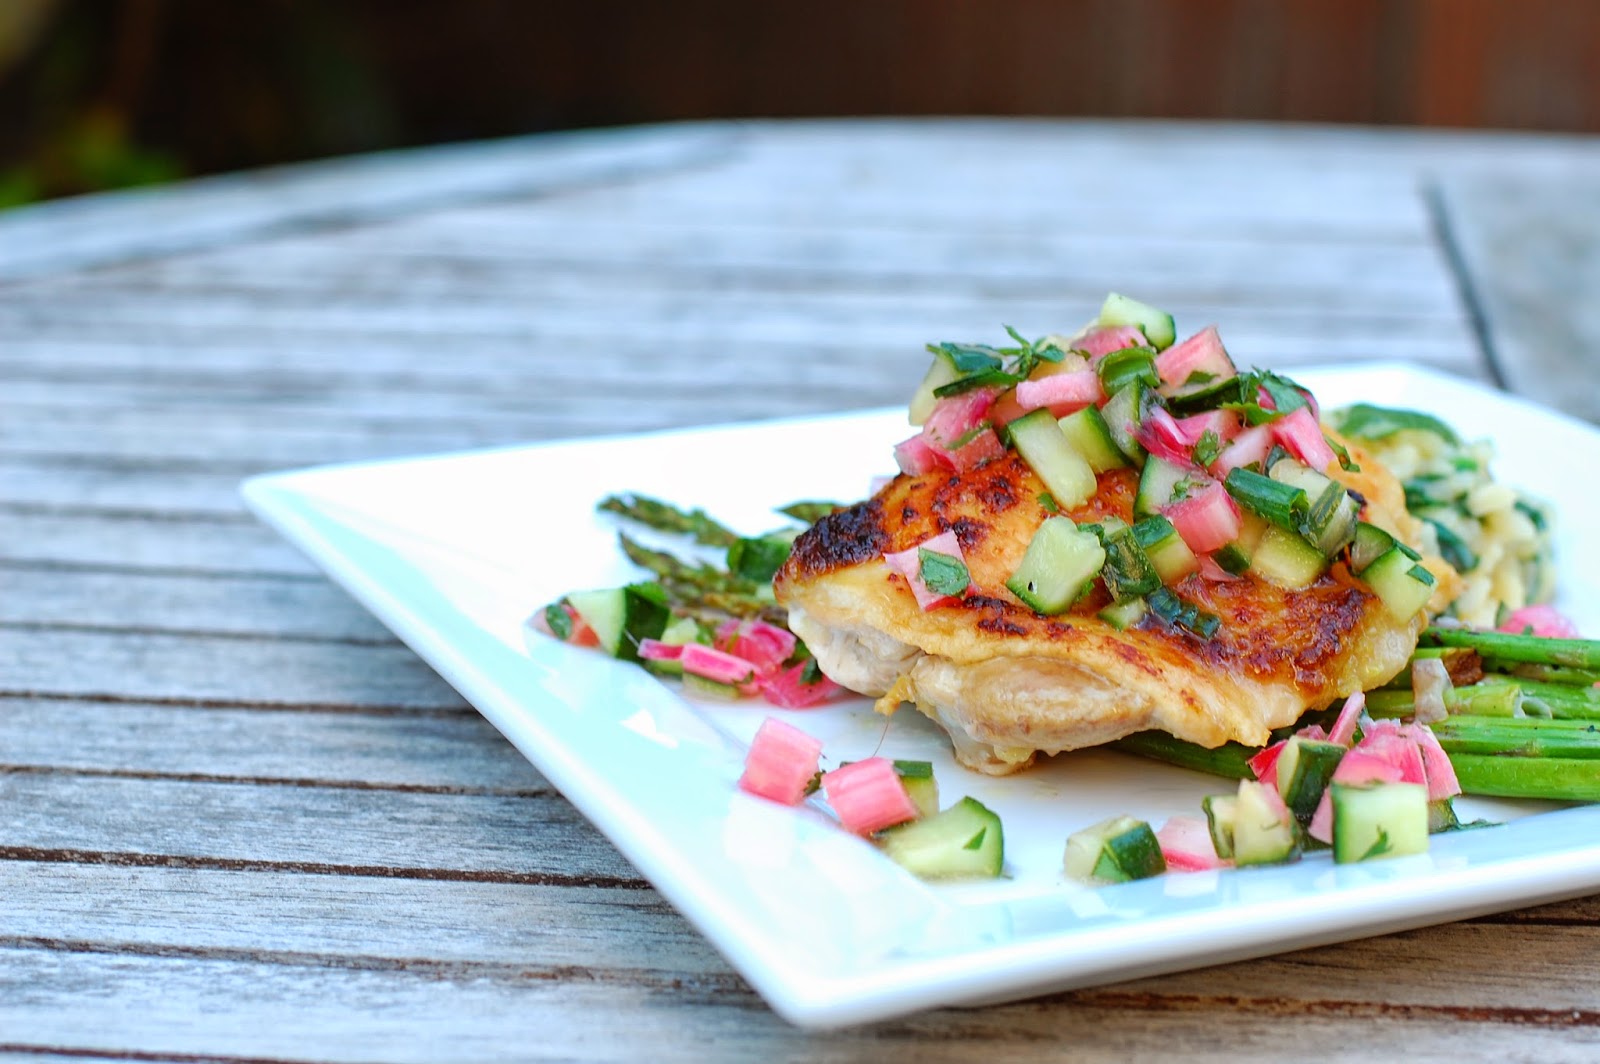
Spicy Chicken Thighs with Rhubarb-Cucumber Salsa

My favorite produce stand, the Yakima Fruit Market and Nursery, finally opened for the season and we've been filling our fridge drawers to literally overflowing every week. Last week I spotted their first crop of rhubarb and immediately thought of this dish. It's a perfect meal for either spring or summer and comes together quickly with just a little chopping. The cool salsa is a great contrast to the spicy sauce on the chicken. I've always loved the nice kick the habanero chile gives the sauce. Tonight I didn't have any habernos handy so I just used a jalapeno instead. I'm pretty sure my girls said a silent prayer of thanks (they are always requesting I make things "less spicy next time"). The jalapeno version turned out much milder which was great for the kids but personally I missed the heat so I'd say go for the habanero or a few jalapenos if you're like me and think spice is nice. It's rhubarb season which probably means a pie post is soon to follow!

Spicy Chicken Thighs with Rhubarb-Cucumber Salsa
(From Bon Appetit Magazine)

1 habanero, Scotch bonnet, or Thai chile, with seeds, stemmed (or 1 jalapeno if you don't want much kick)
2 garlic cloves
2 scallions, thinly sliced, white and green parts divided
1 tablespoon soy sauce
1/4 cup olive oil
6 large skin-on, bone-in chicken thighs
Kosher salt
1 1/2 cups 1/4-inch cubes rhubarb
1 cup 1/4-inch cubes unpeeled seeded English hothouse cucumber
1/2 cup coarsely chopped fresh cilantro
1 tablespoon honey
1 tablespoon vegetable oil

Preheat oven to 500°. Line a baking sheet with foil. Pulse chile, garlic, and white parts of scallions in a food processor until finely chopped. With machine running, drizzle in soy sauce, then olive oil; process until emulsion forms. Transfer sauce to a bowl.

Place chicken thighs, skin side up, on a work surface and slash each crosswise at 3/4-inch intervals down to the bone. Season lightly with salt. Place on prepared baking sheet and brush with sauce. Bake until skin is crisp and an instant-read thermometer inserted into thickest part of thigh registers 165°, 20–25 minutes. Broil on high for an additional 2–3 minutes for crisper skin, if desired. Let rest for 5–10 minutes.

Meanwhile, toss rhubarb, next 5 ingredients, and green parts of scallions in a medium bowl to coat. Season to taste with salt and pepper and let stand for at least 10 minutes to allow flavors to meld. Serve chicken with rhubarb salsa alongside.

Serves 4


Thursday, March 27, 2014

Rosemary Flatbread with Blue Cheese, Grapes and Honey

I remember the first time we had this bread. It was about 4:30 PM and we were having dinner guests. I don't even recall what I was making other than that I was elbow deep in some sort of intricate prep work and that we were going to be lucky if anything was going to be ready to go on the table when the company arrived. Out of nowhere, my dear husband says "I want to make bread for tonight." Say what? "Like with yeast?" I said. "Uh huh," he replied.

Those of you who have ever made yeast bread from scratch know it usually isn't something done on a whim when guest are expected to arrive in 90 minutes. Except when you're Graham. And then rules don't apply and anything is possible. And I'll be darned, usually anything is possible with him and he somehow Pulls. It. Off. It drives me bonkers because logic (and I) tell him it can't happen and then he just makes it happen. And makes it look easy. So this guy, who had never made yeast bread in all his life, just whips this one up and it's perfect. Perfect. And hot and ready when our dinner guests arrive. Go figure! If you're new to bread baking and looking for a yeast bread recipe to break you in, apparently this one is it. It is so totally delicious and makes a great appetizer while you're scrambling to get the rest of dinner ready (but that never happens here...right....)

Rosemary Flatbread with Blue Cheese, Grapes and Honey
(From Food and Wine Magazine)


1 envelope (or 2 ¼ tsp) active dry yeast
2 tablespoons sugar
2 cups bread flour, plus more for rolling
3/4 cup warm water
2 teaspoons chopped fresh rosemary
1/2 teaspoon table salt
1/4 teaspoon freshly ground pepper
1/2 pound red grapes (1 ½ cups)
Coarse sea salt
3 ounces blue cheese, crumbled (1/2 cup)
1 tablespoon honey
1 tablespoon snipped chives

In a large bowl, whisk the yeast and sugar with 1/4 cup of the flour. Stir in 1/4 cup of the warm water and let stand until slightly foamy, about 5 minutes. Add the rosemary, fine salt, pepper and the remaining 1 3/4 cups of flour and 1/2 cup of water; stir until a dough forms. Turn the dough out onto a lightly floured work surface and knead until smooth, about 5 minutes. Transfer the dough to an oiled bowl, cover and let rise in a draft-free spot until billowy and doubled in bulk, about 1 hour.

Meanwhile, preheat the oven to 450°. Place a pizza stone in the bottom of the oven, and preheat for at least 30 minutes.

Turn the dough out onto a lightly floured work surface. Press and stretch the dough into a 13-inch round, then transfer to a lightly floured pizza peel. Press the grapes into the dough and sprinkle with sea salt.

Slide the flatbread onto the hot stone and bake for about 12 minutes, until the crust is golden and the grapes have begun to release some of their juices. Sprinkle the blue cheese on top and bake for about 2 minutes longer, until the cheese melts. Slide the flatbread onto a work surface and drizzle with the honey and sprinkle with the chives. Cut into wedges and serve.


Makes 1 (13-inch) flatbread

Friday, March 7, 2014

Almond Quinoa Breakfast Cookies

I'm on a clean-out-the-pantry kick. And by "pantry" I mean that one cupboard with a few shelves that we cram full of everything from dry goods to kitchen equipment to vitamins. We do live in a townhouse after all. These clear-the-shelves kicks really should happen more than they do based on the number of times I get nailed with something sliding of my - ahem- perfectly organized piles of food in there. I've learned to open the cupboard cautiously. Death from above!

Anyway, back on topic. QUINOA! 

This was the ingredient of the week to get kicked out of my cupboard. I cooked up a large batch earlier in the week to serve with a Black bean, Roasted Corn and Avocado Salad, reserving a cup of it for this breakfast cookie recipe. Ever since Isla started preschool, I'm always in the market for more quick breakfast items I can just pull out of the freezer. I have the best of intentions of waking up earlier someday to nourish her with hot breakfasts but let's be honest, that just isn't happening right now. So enter breakfast cookies. These puppies are so versatile and can be packed with protein and fiber and yummy goodies. I'm collecting a few favorites over here and this here is one of them. The original recipe came from Bon Appetit Magazine, but then I made the absolutely substitution of some of the dried cranberries for chocolate chips. And then I added another secret ingredient, sort of by accident. Ok totally by accident. 

Let's just say when I made the big batch of cooked quinoa from my black bean salad recipe, I was super careful to reserve some for these cookies before adding the olive oil and salt and pepper to the rest. What I didn't remember until this morning when I was mixing up the cookie dough was what I used to cook the quinoa.... Yep, my quinoa was cooked in none other than chicken broth. CHICKEN BROTH! Lol. Some of us aren't getting enough sleep over here! I thought twice about using it (for like 3 seconds) before I decided Oh heck, let's just throw it in there and see how they taste! And to be honest, they actually turned out. They maybe a smidge saltier than the first time I made them but they are still mighty tasty for a reasonably healthful breakfast treat. I think the almond extract saved my bacon. So chicken broth or not, enjoy!

Almond Quinoa Breakfast Cookies

1 1/2 cups white whole wheat flour
1 teaspoon kosher salt
1/2 teaspoon baking powder
1/2 teaspoon baking soda
1/2 cup (1 stick) unsalted butter, room temperature
1/4 cup sugar
1/4 cup (packed) light brown sugar
1/4 cup honey
2 large eggs
1 teaspoon vanilla extract
1/2 teaspoon almond extract
1 cup cooked quinoa, cooled
1 cup old-fashioned oats
1/2 cup dried cranberries
1/2 cup chocolate chips
1/2 cup slivered almonds

Preheat oven to 375°. Whisk flour, salt, baking powder, and baking soda in a medium bowl. Using an electric mixer, beat butter, both sugars, and honey in a large bowl until light and fluffy, about 3 minutes. Add eggs and extracts; beat until pale and fluffy, about 2 minutes. Beat in flour mixture, 1/2 cup at a time. Stir in quinoa, oats, cranberries, chocolate chip, and almonds. Spoon dough in 2-tablespoon portions onto baking sheets greased with cooking spray, spacing 1” apart. Bake cookies until golden, 12–15 minutes. Transfer cookies to a wire rack and let cool. DO AHEAD: Store cooled cookies airtight at room temperature for 1 day, or freeze for up to 1 month.

Makes ~24 cookies

Sunday, February 9, 2014

Carrot Cupcakes with Coconut-Cream Cheese Frosting

I'm a sucker for cream cheese frosting and lately for anything coconut too. So why not marry the two? Exactly. Why not? These cupcakes were deemed delicious even by some individuals who claimed to not like coconut or carrot cake. So there. They made an appearance at my eldest's first birthday party and now also at the first birthday parties of a few friends around us. I mean, they have carrots, raisins and pineapple in them so they are practically a healthy food. WARNING: you might want to make a double batch as this recipes only makes 12 cupcakes and, honestly, who eats just one cupcake? 

Carrot Cupcakes with Coconut-Cream Cheese Frosting
(From Cooking Light Magazine)

Cupcakes:

2/3 cup granulated sugar
3 tablespoons vegetable oil
1 teaspoon vanilla extract
1 large egg
1 cup finely shredded carrot
1 (8-ounce) can crushed pineapple in juice, well-drained
1 cup all-purpose flour
1 teaspoon baking powder
3/4 teaspoon ground cinnamon
1/4 teaspoon baking soda
1/8 teaspoon salt
1/8 teaspoon ground nutmeg
1/4 cup raisins

Frosting:


1/4 cup (2 ounces) 1/3-less-fat cream cheese, chilled
1 tablespoon butter or stick margarine, softened
1/8 teaspoon imitation coconut flavor (optional)
1 1/3 cups powdered sugar
3 tablespoons flaked sweetened coconut

Preheat oven to 350°.

To prepare cupcakes, beat first 4 ingredients at medium speed of a mixer until well-blended. Add carrot and pineapple; beat well. Lightly spoon flour into a dry measuring cup; level with a knife. Combine flour and next 5 ingredients (flour through nutmeg) in a bowl, stirring well with a whisk. Add flour mixture to sugar mixture; beat well. Stir in raisins.

Spoon batter into 12 muffin cups lined with paper liners. Bake at 350° for 20 minutes or until a wooden pick inserted in center comes out clean. Cool in pan 5 minutes on a wire rack; remove from pan. Cool completely on wire rack.

To prepare frosting, beat the cream cheese, butter, and coconut flavor at medium speed of a mixer just until blended. Gradually add powdered sugar (do not overbeat). Spread frosting over cupcakes; sprinkle with flaked coconut. Store, covered, in refrigerator.

Makes 12 cupcakes

Friday, January 17, 2014

Beef and Butternut Squash Pot Pie

I'm on a roll.

Two recipes this week that I practically made up! Well, or at least parts of them. I can't actually take a tremendous amount of credit for this one as I more or less just threw a pie crust on top of a delicious stew recipe we had last month, but still. It's progress.

This creation also was a half birthday request from my dear husband. You see, it all started with a bottle of winter ale we had in our fridge. He wanted to drink it and so worked backwards from there. What would pair well with it? English pub food of course! Only one slight problem: we hate English pub food. Ordinarily we hate stew too except that we happened upon this gem of a recipe (below) from Giada De Laurentis last month. Prior to this point, beef stew always tastes like beef stew and nothing could be less enthralling to me than the flavors of beef, potatoes, carrots and onion and mushed together into, well, mush. Seriously, gag me (sorry all you beef stew lovers!) But this stew recipe has changed my life (or at least my strong opinion). 

Why did I even make beef stew if I hate it so much, you ask? There is nothing like buying 1/6 of a cow to get you to change your ways and break out of your comfort zone. Especially when one of the packages of frozen meat comes with "beef stew meat" stamped across it in giant red letters. I even Googled "beef stew meat recipes" to try and determine an alternative use but, wouldn't you know it, I only encountered beef stew recipes.  

Oh but what a sweet surprise when I discovered the use of butternut squash in beef stew! And with an Italian twist! Seriously amazing. You can make just the beef stew and serve it as is along with crusty bread and it's delicious. Or you can continue on in the recipe and go all English pub on it and throw a pie crust on top like my husband suggested. Your choice. Both are winners!

Beef and Butternut Squash Stew (or Pot Pie)

Beef stew:
3 tablespoon olive oil
1 onion, peeled and chopped
2 cloves garlic, chopped
1 tablespoon minced fresh rosemary
1 tablespoon chopped fresh thyme
2 pounds stew beef, cut into 2-inch cubes
1/2 teaspoon salt, plus more to taste
1/2 teaspoon freshly ground black pepper, plus more to taste
2 tablespoons all-purpose flour
1 cup Marsala wine
1 pound butternut squash, trimmed and cut into 2-inch cubes
1/4 cup chopped sun-dried tomatoes
3 to 4 cups beef broth
2 tablespoons fresh chopped flat-leaf parsley
Crusty bread, for serving

Beef stew pot pie:
2 Tbsp butter
1/4 cup flour
1 (9-inch) pie crust recipe (or cheat and use Trader Joe's frozen ones like I did - I love them and they are transfat free!)


To prepare stew:

In a large soup pot heat 3 tablespoons of olive oil over medium heat. Add the onions, garlic, rosemary, and thyme and saute until the onions are tender, about 2 minutes. Toss the beef cubes in salt and pepper and flour. Turn up the heat to med-high and add the beef to the pot. Cook until the beef is browned and golden around the edges, about 5 minutes. Add the Marsala wine. Using a wooden spoon, gently stir up all the brown bits off the bottom of the pan. Add the butternut squash and sun-dried tomatoes and stir to combine. Add enough beef broth to just cover the beef and squash. Bring the stew to a boil over high heat, then reduce the heat to low and simmer, covered, for 1 hour. Season the stew with additional salt and pepper to taste. Sprinkle with the chopped parsley. Serve with crusty bread alongside.

To prepare pot pie:
Preheat oven to 350 degrees F. Prepare stew recipe through seasoning with additional salt and pepper to taste step. Melt butter in a large saucepan. Add flour and stir constantly to brown for ~1 minutes to create a roux. Pour off stew liquid into the the flour/butter mixture, whisking constantly to eliminate lumps. Bring to a low boil and simmer until thickened, ~7-10 minutes. Return thickened stew liquid to beef and butternut squash mixture and combine gently (I discarded ~1 cup of liquid to keep liquid to solid ratio desirable). Pour pot pie filling into a greased, deep-dish pie pan. Top with pie crust, crimping edges and poke holes to vent. Place pie on cookie sheet and bake for ~1 hour, until crusted is golden brown. 

Serves 6

Beef and Butternut Squash Pot Pie

I'm on a roll.

Two recipes this week that I practically made up! Well, or at least parts of them. I can't actually take a tremendous amount of credit for this one as I more or less just threw a pie crust on top of a delicious stew recipe we had last month, but still. It's progress.

This creation also was a half birthday request from my dear husband. You see, it all started with a bottle of winter ale we had in our fridge. He wanted to drink it and so worked backwards from there. What would pair well with it? English pub food of course! Only one slight problem: we hate English pub food. Ordinarily we hate stew too except that we happened upon this gem of a recipe (below) from Giada De Laurentis last month. Prior to this point, beef stew always tastes like beef stew and nothing could be less enthralling to me than the flavors of beef, potatoes, carrots and onion and mushed together into, well, mush. Seriously, gag me (sorry all you beef stew lovers!) But this stew recipe has changed my life (or at least my strong opinion). 

Why did I even make beef stew if I hate it so much, you ask? There is nothing like buying 1/6 of a cow to get you to change your ways and break out of your comfort zone. Especially when one of the packages of frozen meat comes with "beef stew meat" stamped across it in giant red letters. I even Googled "beef stew meat recipes" to try and determine an alternative use but, wouldn't you know it, I only encountered beef stew recipes.  

Oh but what a sweet surprise when I discovered the use of butternut squash in beef stew! And with an Italian twist! Seriously amazing. You can make just the beef stew and serve it as is along with crusty bread and it's delicious. Or you can continue on in the recipe and go all English pub on it and throw a pie crust on top like my husband suggested. Your choice. Both are winners!

Beef and Butternut Squash Stew (or Pot Pie)

Beef stew:
3 tablespoon olive oil
1 onion, peeled and chopped
2 cloves garlic, chopped
1 tablespoon minced fresh rosemary
1 tablespoon chopped fresh thyme
2 pounds stew beef, cut into 2-inch cubes
1/2 teaspoon salt, plus more to taste
1/2 teaspoon freshly ground black pepper, plus more to taste
2 tablespoons all-purpose flour
1 cup Marsala wine
1 pound butternut squash, trimmed and cut into 2-inch cubes
1/4 cup chopped sun-dried tomatoes
3 to 4 cups beef broth
2 tablespoons fresh chopped flat-leaf parsley
Crusty bread, for serving

Beef stew pot pie:
2 Tbsp butter
1/4 cup flour
1 (9-inch) pie crust recipe (or cheat and use Trader Joe's frozen ones like I did - I love them and they are transfat free!)

To prepare stew:

In a large soup pot heat 3 tablespoons of olive oil over medium heat. Add the onions, garlic, rosemary, and thyme and saute until the onions are tender, about 2 minutes. Toss the beef cubes in salt and pepper and flour. Turn up the heat to med-high and add the beef to the pot. Cook until the beef is browned and golden around the edges, about 5 minutes. Add the Marsala wine. Using a wooden spoon, gently stir up all the brown bits off the bottom of the pan. Add the butternut squash and sun-dried tomatoes and stir to combine. Add enough beef broth to just cover the beef and squash. Bring the stew to a boil over high heat, then reduce the heat to low and simmer, covered, for 1 hour. Season the stew with additional salt and pepper to taste. Sprinkle with the chopped parsley. Serve with crusty bread alongside.

To prepare pot pie:
Preheat oven to 350 degrees F. Prepare stew recipe through seasoning with additional salt and pepper to taste step. Melt butter in a large saucepan. Add flour and stir constantly to brown for ~1 minutes to create a roux. Pour off stew liquid into the the flour/butter mixture, whisking constantly to eliminate lumps. Bring to a low boil and simmer until thickened, ~7-10 minutes. Return thickened stew liquid to beef and butternut squash mixture and combine gently (I discarded ~1 cup of liquid to keep liquid to solid ratio desirable). Pour pot pie filling into a greased, deep-dish pie pan. Top with pie crust, crimping edges and poke holes to vent. Place pie on cookie sheet and bake for ~1 hour, until crusted is golden brown. 

Serves 6

Thursday, January 16, 2014

The "Purple Chopped" Salad

We aren't typically people of repetition when it comes to dining. I was once asked to write down the top 20 meals I like to prepare for my family. I literally couldn't do it. I think I ran out of steam at #12. I'm the trier-of-all-things-new when it comes to food and there are only a handful of favorites that I have ever repeated. The same goes for restaurants. Life is short and you sometimes just want to try them all. But then you find that place you love, the place that hits a home run every time you go. And so you break all your rules and return. That's the Purple Cafe and Wine Bar for us. We've probably been there at least 7 times. SEVEN TIMES! A personal record for us. 

I'm pretty sure every time but once, we ordered their Purple Chopped Salad and I so totally regretted not getting it. It's filling and delicious and packed with so much topping good-ness that you hardly notice you are eating a salad. I always look forward to it with as much anticipation as dessert. Almost.

Imagine my delight when Graham requested the infamous Purple Chopped for his half birthday this week. Why had I never thought to attempt to recreate it before? I'm a by-the-books-follow-the-rules kind of person so making it up recipes and trying to mimic flavors has never been my forte but I'm trying! And I'm quite proud to report, I totally nailed this one. So, without further ado, my "Purple Chopped":

My "Purple Chopped" Salad 

Salad:
3 hearts of romaine, chopped
1/2 small red onion, chopped small
1 cup garbanzo beans, rinsed and drained
3 pieces of bacon, cooked and crumbled
1 roasted red bell pepper, chopped
1/2 cup crumbled blue cheese
1 avocado, diced
Fresh ground black pepper, to taste

Balsamic Vinaigrette Dressing:
8 large garlic cloves, minced (~2 Tbsp)
1/2 tsp crushed red pepper flakes
1/2 cup balsamic vinegar
1 cup extra virgin olive oil
1 Tbsp brown sugar
Kosher salt, to taste

To prepare salad:
Fill large bowl with lettuce and layer next 6 ingredients over top. Finish with a generous douse of fresh ground black pepper.

To prepare dressing:
Combine garlic and red pepper flakes in a large jar or salad dressing bottle. Cover with balsamic vinegar. Let sit for ~5-10 minutes. Add olive oil, brown sugar and salt, to taste. Shake well. 

To assemble:
Toss salad with a generous amount of balsamic vinaigrette. Save remaining dressing for a later use (there will be dressing left over). 

Serves 8

Sunday, January 12, 2014

Aushak

Have you read Garlic and Sapphires by Ruth Reichl? Simply put, I adore this book. In fact, it single-handedly sent me spiraling into continuous Google searches for terms like "foodie novels" or "best books for foodies" for a while there. As it turns out (this may be no surprise here), I love me a good food memoir. This book in particular is my all time favorite and I have yet to find a foodie book I like better. I guess that could be because I secretly want to be a food critic. Like really badly. Oh to get paid to eat and write about delicious food! All this to say, if you like reading and you like food, find yourself a copy ASAP!

The book incorporates recipes, two of which have become regulars in our repertoire. I wouldn't necessarily call this one easy but I wouldn't call it complicated either. It's mostly just a bit time consuming but if you have friends or a spouse or small children with eager helping hands, the dumplings come together in no time. I haven't done this myself but I would imagine the sauce would freeze nicely if you made a giant batch and put some away for later.

Aushak is an Afghan dish often served on holidays or special occasions. I altered Reichl's version of the meat sauce slightly, mostly to accommodate the neatly portioned 1 pound packages of ground beef in my freezer (her recipe only called for 1/2 pound). In my opinion, my version provides a better meat sauce-to-dumpling ratio. I'll better the sauce would taste mighty fine made with lamb too. WARNING: the dumplings have some kick if you include the full teaspoon of red pepper flakes. My girls cried their way through the meal. Just a little. The yogurt sauce really helps calm down the spice though if you happen to overdo it. 


Aushak

Meat sauce:
3 tbsp vegetable oil
1 large onion, finely chopped
1 lb ground beef
2 cloves garlic, minced
2 tsp ground coriander
1 tsp diced ginger
1 cup water
1/4 cup tomato paste
Kosher salt and fresh ground pepper, to taste

Yogurt sauce:
1 cup nonfat plain Greek yogurt
1 Tbsp garlic, minced
Kosher salt, to taste (~1/4 tsp)

Dumplings:
2 scallion bunches, green tops finely chopped (leave out the white part)
1/2 tsp Kosher salt

1/2 tsp fresh ground black pepper
1 tsp red chili flakes
1 tsp garlic, minced
1 pkg round gyoza wrappers

Garnish:
Chopped fresh mint


To prepare meat sauce:


Heat oil in small skillet. Add onion and cook for 5 minutes until golden. Add beef, garlic, coriander, and ginger and cook, stirring often, about 5 minutes until meat is no longer red. Add water and cook, stirring often, until reduced by half, about 5 minutes. Add tomato paste, stir, and cook another 5 minutes. Season with salt and pepper and set aside.


To prepare yogurt sauce:

Blend ingredients in a small bowl and set aside.

To prepare dumplings:

Combine ingredients in a small bowl. Lay 1 tsp mixture in center of each wrapper and moisten edge. Fold over and press edges to make semicircles. 
Bring 3 quarts of water to a boil in a large pot. Add dumplings and cook for 5 minutes.
To assemble:
Spoon 1/4 cup yogurt sauce onto a serving dish and cover with dumplings. Spoon remaining yogurt sauce on top and garnish with chopped fresh mint. Spoon meat sauce all around, and serve at once.
Serves 4

Aushak

Have you read Garlic and Sapphires by Ruth Reichl? Simply put, I adore this book. In fact, it single-handedly sent me spiraling into continuous Google searches for terms like "foodie novels" or "best books for foodies" for a while there. As it turns out (this may be no surprise here), I love me a good food memoir. This book in particular is my all time favorite and I have yet to find a foodie book I like better. I guess that could be because I secretly want to be a food critic. Like really badly. Oh to get paid to eat and write about delicious food! All this to say, if you like reading and you like food, find yourself a copy ASAP!

The book incorporates recipes, two of which have become regulars in our repertoire. I wouldn't necessarily call this one easy but I wouldn't call it complicated either. It's mostly just a bit time consuming but if you have friends or a spouse or small children with eager helping hands, the dumplings come together in no time. I haven't done this myself but I would imagine the sauce would freeze nicely if you made a giant batch and put some away for later.

Aushak is an Afghan dish often served on holidays or special occasions. I altered Reichl's version of the meat sauce slightly, mostly to accommodate the neatly portioned 1 pound packages of ground beef in my freezer (her recipe only called for 1/2 pound). In my opinion, my version provides a better meat sauce-to-dumpling ratio. I'll better the sauce would taste mighty fine made with lamb too. WARNING: the dumplings have some kick if you include the full teaspoon of red pepper flakes. My girls cried their way through the meal. Just a little. The yogurt sauce really helps calm down the spice though if you happen to overdo it. 


Aushak
Meat sauce:
3 tbsp vegetable oil
1 large onion, finely chopped
1 lb ground beef
2 cloves garlic, minced
2 tsp ground coriander
1 tsp diced ginger
1 cup water
1/4 cup tomato paste
Kosher salt and fresh ground pepper, to taste

Yogurt sauce:
1 cup nonfat plain Greek yogurt
1 Tbsp garlic, minced
Kosher salt, to taste (~1/4 tsp)

Dumplings:
2 scallion bunches, green tops finely chopped (leave out the white part)
1/2 tsp Kosher salt

1/2 tsp fresh ground black pepper
1 tsp red chili flakes
1 tsp garlic, minced
1 pkg round gyoza wrappers

Garnish:
Chopped fresh mint


To prepare meat sauce:

Heat oil in small skillet. Add onion and cook for 5 minutes until golden. Add beef, garlic, coriander, and ginger and cook, stirring often, about 5 minutes until meat is no longer red. Add water and cook, stirring often, until reduced by half, about 5 minutes. Add tomato paste, stir, and cook another 5 minutes. Season with salt and pepper and set aside.

To prepare yogurt sauce:

Blend ingredients in a small bowl and set aside.

To prepare dumplings:

Combine ingredients in a small bowl. Lay 1 tsp mixture in center of each wrapper and moisten edge. Fold over and press edges to make semicircles. 
Bring 3 quarts of water to a boil in a large pot. Add dumplings and cook for 5 minutes.
To assemble:
Spoon 1/4 cup yogurt sauce onto a serving dish and cover with dumplings. Spoon remaining yogurt sauce on top and garnish with chopped fresh mint. Spoon meat sauce all around, and serve at once.
Serves 4

Wednesday, January 8, 2014

Chinese Chicken Salad

After a rather indulgent December, a couple of us were feeling the need for some hearty main-dish salads around here. It just so happened that I had everything but a head of napa cabbage on hand to throw this one together tonight. I'd forgotten how completely delicious and easy it is! The original recipe came from our friend Lacey who delivered it to us after Emma was born. Ironically, she was the salad's biggest fan tonight, dishing up sevenths and even eighths - a first for any of my kids which ordinarily rarely touch salad! I think it was the sweet dressing that won her over. It probably helped that she just received a handmade bunny blanket and I told her bunnies like cabbage....

I made a couple of minor adaptions to the recipe and next time I think I'll throw in a dash or two of sesame oil for a more savory flavor but I was all out tonight. I served the salad with Nutmeg and Fresh Black Pepper Popovers (totally random and not Chinese whatsoever but I've had the recipe lying around waiting to be tried for ages and an all-salad dinner seemed like the perfect opportunity...) The whole meal was a hit with everyone. Enjoy!

Chinese Chicken Salad

Dressing:
1/3 cup sugar
1/2 cup canola oil
1/4 cup red wine vinegar
1 Tbsp rice vinegar
1 Tbsp soy sauce

Topping:
2 Tbsp butter
1/4 cup sliced almonds
1/4 cup sunflower seeds
2 pkg dried ramen noodles, crushed

Salad:
1 head napa cabbage, chopped
3 green onions, chopped
3 mandarin oranges, peeled and broken into segments
3 cups chopped, cooked chicken (I used rotisserie from a meal earlier this week)
2 Tbsp sesame seeds

To prepare dressing, combine ingredients (sugar through soy sauce) in a small saucepan and bring to a low boil until sugar dissolves. Remove from heat and cool.

To prepare topping, melt butter over medium high heat in a large non-stick skillet. Add almonds, sunflower seeds and ramen and saute until golden brown.

To prepare salad, combine cabbage, green onions, oranges and chicken in a large bowl. Add topping and toss with dressing. Sprinkle with sesame seeds and serve.

Saturday, November 2, 2013

Thankful - Day 2: Cooking

I am thankful today for the ability to cook and create in the kitchen! I love that what was once flour and yeast and milk can come together and make delicious things like homemade Cinnamon Raisin Swirl Bread (ok so I cheated a little and let the bread machine do the kneading part but who has time to brush their hair let alone make yeast dough from scratch with a newborn?!) 

After a few weeks out of my element (read: not cooking), I felt the urge to do something domestic in the kitchen and so Emma and I whipped up a couple loaves of this bread yesterday (recipe found here:
 http://allrecipes.com/recipe/cinnamon-swirl-bread-for-the-bread-machine/. Noteworthy alteration: I added a handful of raisins to the walnut, brown sugar and cinnamon mixture to make it Cinnamon Raisin Bread).

I'd been craving cinnamon raisin bread for a couple days but then in planning a breakfast for my parents who were going to be in town this weekend, I came across my Pear and Gruyere Strata recipe that calls for cinnamon raisin bread as an ingredient, so it was a win-win decision to try it out. The strata recipe originally comes from Cooking Light Magazine with a couple minor adaptions made by me. Enjoy one recipe or both!

Pear and Gruyère Strata
  • 4 cups sliced peeled Anjou or Concorde pear
  • 2 teaspoons butter, melted
  • 6 tablespoons granulated sugar, divided
  • 12 slices cinnamon swirl bread, cut in half diagonally
  • 1 cup (4 ounces) shredded Gruyère cheese
  • 1 1/2 cups 1% low-fat milk
  • 4 eggs, beaten
  • 1/2 teaspoon ground cinnamon
  • 1 tablespoon turbinado sugar
  • 1/2 cup maple syrup

1. Combine pear, butter, and 1 Tbsp sugar in a large bowl; toss gently. Arrange half of bread in an 7 x 11-in glass baking dish coated with cooking spray. Spoon pear mixture evenly over bread; top with cheese. Arrange remaining bread over cheese.

2. Combine the remaining 5 Tbsp granulated sugar, milk, eggs, and cinnamon, stirring with a whisk. Pour milk mixture over bread, pressing down to submerge. Cover and chill 8 hours or overnight.

3. Preheat oven to 350°. Sprinkle turbinado sugar evenly over bread. Bake, uncovered, for 55 min or until a knife inserted in center comes out clean. Let stand 10 minutes. Drizzle with syrup.
  • Yield: 8 servings

Monday, October 7, 2013

The Farmer's Plate

We have a new system for selecting recipes to try. These days, we are getting most of our ideas from magazines. One or both of us will tear out a page that looks desirable and then eventually, maybe, we make it. Graham selected this recipe and at first I was skeptical. It wasn't something I would have historically been drawn to except for the fact that I adore roasted cauliflower and recently discovered burrata cheese at State Bird Provisions on our California getaway last year. For whatever reason, I decided to indulge Graham and picked up all the ingredients for these recipes for our "company meal" this weekend (I try to have at least one company-worthy meal on the menu each week just in case. I know it sounds good in theory but usually we end up changing our minds or still needing to make a trip to the grocery store when we decide to host but still it's nice to have a few things on hand for special dishes).

Anyhow, on Friday night, since we were not having a baby as planned, we invited over our good friends for a meal. We served The Farmer's Plate as our appetizer and I think it was by far the best dish of the night! I made a few changes to the recipe which I highlighted below. Neither of us are huge fans of tahini and so for the Chickpea Puree, rather than buying a whole tub for $3, using a tablespoon and then tossing the rest, I just skipped it and added a little lemon juice instead. Graham was the mastermind behind the Muhammara (which was so totally amazing, by the way, and would make an awesome romesco-type pasta sauce or sandwich spread). No one seemed to know what piquillo peppers were when I was shopping so I just used regular old jarred roasted red peppers and I don't think the recipe suffered. We served the dips with crusty bread slices, roasted cauliflower, red onions and carrots and the burrata. Though I was thrilled to find the burrata cheese at my local Trader Joe's, I must confess that regular fresh mozzarella probably would have been just as good, not to mention cheaper. YUM! We will definitely be making this appetizer again!


The Farmer's Plate

CHICKPEA PUREE
2 cups canned chickpeas, rinsed and drained
1 tablespoon tahini (I omitted)
1 tablespoon fresh lemon juice
1 garlic clove, crushed
1/2 teaspoon cayenne pepper
1/4 teaspoon ground cumin
1/2 cup extra-virgin olive oil
Kosher salt
Freshly ground black pepper

M UHAM M ARA
2/3 cup walnuts
1/8 teaspoon ground cumin
1/4 cup plus 2 tablespoons extra-virgin olive oil
Half of a 1/4-inch-thick slice of whole wheat bread
3/4 cup drained piquillo peppers (we used jarred red peppers)
1/2 teaspoon pomegranate molasses (optional-we used regular molasses)
1/2 teaspoon fresh lemon juice
1/4 teaspoon kosher salt, plus more for seasoning
Pinch of cayenne pepper
Freshly ground black pepper

6 ounces burrata cheese or buffalo mozzarella, cut into 6 equal pieces, for serving
Grilled peasant bread and roasted vegetables such as carrots, fennel and red onions,
for serving

MAKE THE CHICKPEA PUREE: In a food processor, pulse the chickpeas, tahini (if using), lemon juice, garlic, cayenne and cumin until finely chopped. With the machine on, drizzle in the oil and puree until smooth. Transfer to a bowl; season with salt and pepper. Wipe out the processor.

MAKE THE MUHAMMARA: Preheat the oven to 375°. Toast the walnuts in a pie plate for 5 to 7 minutes, until lightly golden and fragrant. Let cool completely, then transfer the walnuts to the food processor.

Meanwhile, in a small skillet, toast the ground cumin over moderately low heat, stirring, until fragrant, about 2 minutes. Scrape the cumin into the processor. Heat 2 tablespoons of the olive oil in the skillet. Add the bread and cook until golden and crisp on both sides, 3 to 4 minutes. Tear the bread into small pieces and add it to the processor. Add the piquillos, pomegranate molasses, lemon juice, 1/4 teaspoon of salt and the cayenne pepper. With the machine on, drizzle in the remaining 1/4 cup of olive oil and 1 tablespoon of
water and puree until smooth. Season with salt and black pepper. Transfer to a bowl.

Serve the chickpea puree and the muhammara along with burrata, grilled
bread and roasted vegetables.

M AKE AHEAD: The chickpea puree and muhammara can be covered and refrigerated for up to 2 days. Let both return to room temperature before serving.

(Recipes adapted from Food and Wine Magazine)

The Farmer's Plate

We have a new system for selecting recipes to try. These days, we are getting most of our ideas from magazines. One or both of us will tear out a page that looks desirable and then eventually, maybe, we make it. Graham selected this recipe and at first I was skeptical. It wasn't something I would have historically been drawn to except for the fact that I adore roasted cauliflower and recently discovered burrata cheese at State Bird Provisions on our California getaway last year. For whatever reason, I decided to indulge Graham and picked up all the ingredients for these recipes for our "company meal" this weekend (I try to have at least one company-worthy meal on the menu each week just in case. I know it sounds good in theory but usually we end up changing our minds or still needing to make a trip to the grocery store when we decide to host but still it's nice to have a few things on hand for special dishes).

Anyhow, on Friday night, since we were not having a baby as planned, we invited over our good friends for a meal. We served The Farmer's Plate as our appetizer and I think it was by far the best dish of the night! I made a few changes to the recipe which I highlighted below. Neither of us are huge fans of tahini and so for the Chickpea Puree, rather than buying a whole tub for $3, using a tablespoon and then tossing the rest, I just skipped it and added a little lemon juice instead. Graham was the mastermind behind the Muhammara (which was so totally amazing, by the way, and would make an awesome romesco-type pasta sauce or sandwich spread). No one seemed to know what piquillo peppers were when I was shopping so I just used regular old jarred roasted red peppers and I don't think the recipe suffered. We served the dips with crusty bread slices, roasted cauliflower, red onions and carrots and the burrata. Though I was thrilled to find the burrata cheese at my local Trader Joe's, I must confess that regular fresh mozzarella probably would have been just as good, not to mention cheaper. YUM! We will definitely be making this appetizer again!


The Farmer's Plate

CHICKPEA PUREE
2 cups canned chickpeas, rinsed and drained
1 tablespoon tahini (I omitted)
1 tablespoon fresh lemon juice
1 garlic clove, crushed
1/2 teaspoon cayenne pepper
1/4 teaspoon ground cumin
1/2 cup extra-virgin olive oil
Kosher salt
Freshly ground black pepper

M UHAM M ARA
2/3 cup walnuts
1/8 teaspoon ground cumin
1/4 cup plus 2 tablespoons extra-virgin olive oil
Half of a 1/4-inch-thick slice of whole wheat bread
3/4 cup drained piquillo peppers (we used jarred red peppers)
1/2 teaspoon pomegranate molasses (optional-we used regular molasses)
1/2 teaspoon fresh lemon juice
1/4 teaspoon kosher salt, plus more for seasoning
Pinch of cayenne pepper
Freshly ground black pepper

6 ounces burrata cheese or buffalo mozzarella, cut into 6 equal pieces, for serving
Grilled peasant bread and roasted vegetables such as carrots, fennel and red onions,
for serving

1. MAKE THE CHICKPEA PUREE In a food processor, pulse the chickpeas, tahini (if using), lemon juice, garlic, cayenne and cumin until finely chopped. With the machine on, drizzle in the oil and puree until smooth. Transfer to a bowl; season with salt and pepper. Wipe out the processor.

2. MAKE THE MUHAMMARA Preheat the oven to 375°. Toast the walnuts in a pie plate for 5 to 7 minutes, until lightly golden and fragrant. Let cool completely, then transfer the walnuts to the food processor.

3. Meanwhile, in a small skillet, toast the ground cumin over moderately low heat, stirring, until fragrant, about 2 minutes. Scrape the cumin into the processor. Heat 2 tablespoons of the olive oil in the skillet. Add the bread and cook until golden and crisp on both sides, 3 to 4 minutes. Tear the bread into small pieces and add it to the processor. Add the piquillos, pomegranate molasses, lemon juice, 1/4 teaspoon of salt and the cayenne pepper. With the machine on, drizzle in the remaining 1/4 cup of olive oil and 1 tablespoon of
water and puree until smooth. Season with salt and black pepper. Transfer to a bowl.

4. Serve the chickpea puree and the muhammara along with burrata, grilled
bread and roasted vegetables.

M AKE AHEAD The chickpea puree and muhammara can be covered and refrigerated for up to 2 days. Let both return to room temperature before serving.

(Recipes adapted from Food and Wine Magazine)